| Clearing the OBD-II System Readiness Test (P1000) after reflashing or resetting the PCM. |
I have a P1000 DTC. How do I perform a DRIVE CYCLE to reset this?
The following procedure is designed to execute and complete the
OBDII monitors and to clear the Ford P1000, I/M readiness code.
To complete a specific monitor for repair verification, follow
steps 1 through 4 then continue with the step described by the
appropriate monitor found under the "OBDII Monitor Exercised"
column. When the ambient air temperature outside is 4.4° to
37.8°C (40° to 100° F), or the altitude is above 2,438 meters
(8000 feet), the EVAP monitor will not run. If the P1000 code
must be cleared in these conditions, the PCM must detect them
once (twice on some applications) before the EVAP monitor can be
"bypassed" and the P1000 cleared. The EVAP "bypassing" procedure
is described in the drive cycle.
The OBDII Drive Cycle will be performed using a scan tool.
Consult the instruction manual for each described function.
NOTE: A detailed description of a Powertrain Control Module (PCM)
Reset is found in this section; refer to the table of contents.
Drive Cycle Recommendations:
-
Most OBDII monitors will complete more readily using a "steady
foot" driving style during cruise or acceleration modes.
Operating the throttle in a "smooth" fashion will minimize the
time required for monitor completion
-
Fuel tank level should be between 1/2 and 3/4 fill with 3/4
fill being the most desirable.
-
The Evaporative Monitor can only operate during the first 30
minutes of engine operation. When executing the procedure for
this monitor, stay in part throttle mode and drive in a smooth
fashion to minimize "fuel slosh".
-
WARNING: STRICT OBSERVANCE OF POSTED SPEED LIMITS AND ATTENTION
TO DRIVING CONDITIONS ARE MANDATORY WHEN PROCEEDING THROUGH THE
DRIVE CYCLES.
Please download the following document and follow each
of the steps as accurately as possible.
OBDII System Readiness Testing Table.pdf
|
| F-150 Intake Snorkel Removal |
Known as the "Poor Man's Cold Air Intake", the "DWV Mod" or the "Gotts Mod" is an inexpensive and easy way to improve the airflow of the factory intake while netting yourself a nice little power bump from 2800 RPM to redline. This modification is originally intended to work on the 2004 to 2008 F-150 where the air filter assembly is located on top of the throttle body itself, but should also work on the earlier F-150, Expeditions, and even the larger F-250/350 series gas trucks with minor adjustments.
This modification takes about an hour and should cost less than $25.00 with parts available form any Home Depot, Lowes, or other home improvement/hardware store.
We would like to thank David Ferguson (kd4crs) for this contribution. Also, thanks to members JackandJanet, AgentOrange, and Mark123 for their insight and contributions.
For more details including variations of this modification submitted by other members, please check the following thread:
The kd4crs/Power Hungry/Gotts Mod (revisited - and with pictures)
Enjoy!
DWV
intake mod for the 2004-2008 F150 with 5.4L engine
Materials:
-
7.5 inch length of 3 inch
inside diameter black ABS DWV pipe.
-
One female-to-female 3 inch
black ABS coupler.
-
One rubber downspout
connector from the plumbing section of Lowes or Home Depot.
-
One 4 inch stainless steel
worm clamp.
-
Small container of ABS pipe
glue.
Assembly:
-
Cut black ABS pipe to length
and remove any burrs from the ends.
-
Apply a light coat of ABS
pipe glue to the end of the black ABS DWV pipe in a one inch wide strip.
Apply a light coat of ABS glue to the inside of one end of the female coupler
and immediately press the coupler into the black ABS DWV pipe with a twisting
motion to fully seat the pipe into the coupler. Allow to dry 30 minutes.
-
Attach rubber downspout
connector over end of female coupler and seat fully.
Installation:
-
Remove stock intake tube by
removing 10mm bolt holding it in place.
-
Using a large flat blade
screwdriver, insert it in the joint at the end of the flex section on the
bottom where the notch is in order to remove the snorkel. Spraying
silicone lubricant or WD-40 in the joint will help it come out easily. Be
careful not to damage the flex section or snorkel in case you need to return
to stock.
-
Loosen 4 inch stainless steel
worm clamp and slip over end of flex section. Tighten the worm clamp enough
that it will not fall off.
-
Insert the end of the 3 inch
black ABS DWV pipe into the flex section of the intake and slide it into the
flex section as far as it will go.
-
Reinstall stock intake tube
and replace 10mm bolt.
-
Slide the 3 inch black ABS
DWV pipe out of the flex section and seat the downspout adapter in the fender
hole while compressing the flex section.
-
While holding the flex
section compressed, tighten the stainless steel worm clamp to hold the black
ABS DWV pipe in place. IMPORTANT:
If the
flex section is not compressed the DWV intake mod may vibrate or rattle.
All the components laid out:

Everything assembled and ready to go in:

A full 3" inlet. No restrictions here:

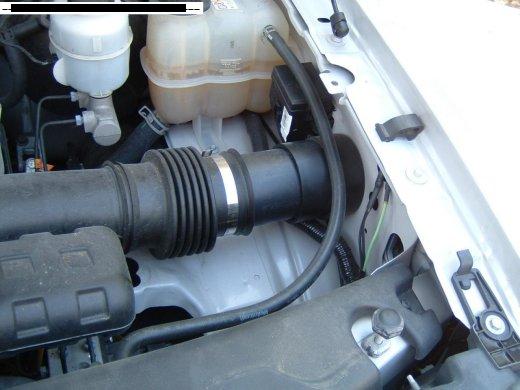
Here's what it looks like installed:
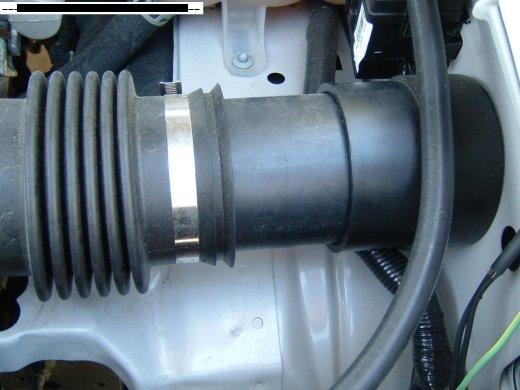
Here's what it looks like installed (closeup):
|
All times are GMT -5. The time now is 04:08 AM.

