|
|||||||
| 1999 to 2003 7.3L Power Stroke Diesel 7.3L Power Stroke Diesel equipped Super Duty and Excursion |
 |
|
|
Thread Tools | Display Modes |
|
#1
 Sat, December 19th, 2009, 03:48 AM
|
||||
|
||||
|
Because this ended up being longer than I expected, I'm writing this in two parts... Installation and Testing results. I am still compiling the the testing data so it is going to be another day or two before I get those results posted but wanted to get this started. So without further ado, here we go.
Part 1: Background and Installation Well, it had to happen sooner or later. Some wise-apple was going to not only throw an Adrenaline HPOP on a bone stock 7.3L, but also get froggy enough to slip an Overdrive in between the sheets (aluminum gasket sheets that is) just to see what's what. And not just any Overdrive, but the same nicely geared 1.667:1 setup that Matt is using on his truck. Actually, I would have posted in Matt's thread, but since the vehicle dynamics are a bit different (different HPOP and injectors) I thought it would be best to keep things separate. This is going to be a sizable post, so grab a drink, a slice of pizza, and get comfortable.  + + [/IMG] = [/IMG] =  Let's start with the basics. The truck is a bone stock, 2000 F250, 4WD, A/T, 3.73 Gears, 285/75-16 tires with 177,011 on the clock. The truck was originally an NVK4 but for testing purposes the PCM has been reflashed to a PMT1 calibration. For the sake of fairness, the test calibration levels were all based on the latest Evolution calibrations utilizing levels 1, 2 and 3 as well as a bone stock calibration for baseline. All datalogs are pulled with the engine running at normal operating temperature with a minimum of 30 minutes of driving to stabilize all fluid temperatures (coolant, engine oil, trans fluid, and fuel). Test runs were procured over the same stretch of road in order to help maintain test accuracy and eliminate any minor changes that may affect the results.  While this was definitely not the most technically challenging bolt-on I've ever done, you will need to be prepared to spend a couple hours on the installation. Because I have relatively small hands, I opted to leave the manifold Y-Pipe (spider) in place although those with larger hands may find it much easier to work with the spider removed. Just make absolutely sure you cover the intake openings with a rag so you don't drop any foreign objects down into the heads. I also must add that I was quite impressed that the whole installation works perfectly with the original fuel bowl. The only clearance issue I experienced was between the passenger side head fuel line and the relief nut on the HPOP. It only took a tiny bit of massaging to provide enough clearance to avoid fuel line failure down the road. Also, because we were running the stock fuel system and fuel bowl, those who have fuel bowl delete and regulated return systems may find this installation to be much simpler. One other thing for folks using the stock fuel bowl; Make sure you have a spare fuel filter and a set of fuel line seals (Ford Part # F81Z-9C387-BA). You may also want to consider replacing the water drain valve (Ford Part # F81Z-9A153-AA) at this time since it will be extremely easy to access the mounting screws. Ford has indicated that they've seen an increase in the number of leaky drains since the release of ULS diesel fuel. WARNING: Before going any further, make sure the battery cables are DISCONNECTED! You will be working in close proximity to the alternator and the glow plug relay and AIH relay (if so equipped), not to mention the fuel system. All you need is one spark and the best you could hope for is figuring out how to get all the fire extinguisher chemicals off your engine. I know this is a dumb thing to have to say, but it's amazing how often this simple thing is overlooked or ignored. I started by using a fluid transfer pump to empty the fuel bowl. I can't even begin to explain the crud that was located in the bottom of the bowl, but suffice to say that it wasn't pretty and was about ¼" deep.  After disposing of the fuel, I unbolted the 4 fuel lines (2 on the left and 2 on the right), removed the water drain tube, disconnected the heater/water sensor connector, removed the 2 fuel bowl bolts (located on the front of the reservoir) and the lifted the fuel bowl out of the way. This gave me a clear view of the stock pump. After disposing of the fuel, I unbolted the 4 fuel lines (2 on the left and 2 on the right), removed the water drain tube, disconnected the heater/water sensor connector, removed the 2 fuel bowl bolts (located on the front of the reservoir) and the lifted the fuel bowl out of the way. This gave me a clear view of the stock pump.Before going any further, I removed all remaining electrical connectors that would be in the way: IPR (back of HPOP), ICP (driver's head), EOT (back/right of reservoir), Oil Pressure (top of reservoir), EBP (front/left of timing cover), and ECT (front/right of timing cover). I also removed the fan belt just for a little extra room. Using the pump, I also transferred all the oil from the HPOP reservoir into a clean, plastic bottle. This makes it easy to refill the reservoir when the installation is complete. Removing the access cover for the HPOP gear is easy enough. The tricky part is removing the steel tube that runs to the EBP sensor assembly which is incorporated into the access cover. I would recommend spraying the nut with WD40 or PB Blaster to help things loosen up. Once the steel tube is out of the way, the cover is removed and you can easily access the HPOP gear bolt. A long breaker bar (24" or better), a 3" extension and an 18mm socket make quick work of removing the bolt. The bolt is a standard thread and unscrews counter-clockwise. Be careful to not drop the washer when removing the bolt, although if you should happen to, don't worry. The washer will not fall below the cam gear and can be easily fished out with a magnet. Moving on to the HPOP, I removed the two high pressure oil lines via the quick disconnect coupler and then removed the two HPOP mounting bolts. A light tap on the back of the HPOP and it slides right out. I took a little time at this point to clean out the engine valley, the fuel bowl (which was an absolute mess), and clean all mating surfaces for the pump and gear cover. Following the installation instructions, I prepped the Adrenaline and the Overdrive for installation, including installing the new IPR and replacing all o-rings on the fittings. Here's the shiny, happy fuel bowl... (click to enlarge...)  (click to enlarge...)  Installation was little more than the reverse of the removal process. I began by placing the Adrenaline HPOP into the engine valley and sliding it back so it was positioned under the spider. Make sure that the mounting bolts are already in place as you will not have room to install them later. With the HPOP pushed back, this gave me enough room to slip the Overdrive into place (making sure the gasket was properly in place) and reattach the drive gear (this actually helps hold the pump in place). I slid the HPOP forward (again, making sure the gasket was properly in place), inserted the nose into the rear of the Overdrive, and then slid the bolts all the way in. At this point, the only catch I had was the fuel line to the passenger's side head (the left/rear line). It was hitting the HPOP relief valve nut. What I ended up doing was placing a flathead screwdriver in between the nut and the fuel line to act as a wedge and then pulled the front of the line (where it attaches to the fuel bowl) slightly forward about 3/8". The line actually bends fairly easily so this wasn't too difficult. The HPOP bolts were then tightened to 15 Ft./Lbs. (click to enlarge...)  (click to enlarge...) (click to enlarge...) The rest of the installation was a snap. With the Adrenaline and Overdrive tight, I torqued down the drive gear bolt to 95 Ft./Lbs. (You may need someone to hold the crankshaft balancer bolt so the engine doesn't turn) I then reinstalled the HPOP gear access cover, the EBP tube, and all electrical connectors except the one to the fuel bowl. The high pressure oil lines snap right into the pump fittings and can be adjusted to make sure they're not rubbing anywhere. You will want to check the passenger side line as it tends to want to lie against the Wastegate Solenoid and Air Charge Sensor harness. The driver's side line had no clearance problems. At this time, I highly recommend changing the fuel line seals. The old ones are a bit tricky to remove as they conform to the fuel line nuts, but with a small screwdriver or a pick they can be removed quite easily. Just insert the screwdriver in between the seal and the nut and, holding the seal in place against the fuel line, unscrew the nut off the seal. Make sure to lightly oil the new seals when reinstalling. With the new seals in place, I reinstalled the (now spotless) fuel bowl along with a new fuel filter. I reattached the fuel bowl heater connector, the water drain tube, and the fan belt, and then gave everything a good once-over to make sure all connections were tight. This is a good time to double check that the left/rear fuel line is not making any contact with the HPOP. If necessary, use a flathead screwdriver to slightly bend the line a bit to make sure that there is at least 5/16" to 3/8" clearance. Otherwise, the line will chafe and a fuel leak could develop. I was good at this point with more than enough clearance. I refilled the reservoir with oil and snugged up the bolt. Another quick double-check and we're ready to go. You will want to hit the key a few times to make sure that the fuel bowl is purged of all air. This may take 3 or 4 key cycles. I generally just turn the key on until the Wait to Start light goes off and then cycle the key again. Feeling satisfied that the fuel bowl was full and that there weren't any leaks coming from the fuel lines, I cranked the engine over. The engine spun for about 6 to 8 seconds and then cracked off without a problem. After about 15 seconds of mild rough idle, the engine smoothed right out. So far, so good. I went back and started checking for any fuel or oil leaks. Everything looked good so I let the engine sit and warm up while I cleaned up and put my tools away. This pretty much covers the installation. This isn't what I'd consider to be an exhaustive set of installation instructions, but more just my recollection of the install and what advice I have to offer to those who are considering installing the Overdrive and/or Adrenaline on their truck. Obviously, installing just an Adrenaline is going to be considerably easier since it bolts directly in place of the original HPOP and doesn't have any of the minor clearance concerns that you might experience when installing the Overdrive. Overall, I'd say that the installation was relatively low difficulty and the instructions were very detailed which made everything easy to follow. In fact, my only deviation from the instructions was to remove the fuel bowl from the reservoir instead of removing the reservoir itself. Removing the reservoir might actually make more sense for less experienced folks because it provides clear access to the HPOP drive gear as well as a bit more working room when maneuvering with the HPOP or Overdrive. Stay tuned for Part 2: Initial Impressions and Test Results 
__________________
Bill Cohron - The Mad Doctor   Power Hungry Performance - The ORIGINAL in Ford performance tuning... Since 1996! (678) 890-1110 www.gopowerhungry.com - Home of the Hydra Chip, Minotaur Tuning Software, and the new Orion Reflash System for Navistar! Bring back  Windows XP and 7. Windows XP and 7.  Windows Vista and Windows 8 is a pain in my a$$! Windows Vista and Windows 8 is a pain in my a$$!  Windows 10 is only slightly less annoying! Windows 10 is only slightly less annoying!
Last edited by Power Hungry; Sat, December 26th, 2009 at 06:59 AM. 
|
|
#3
Sat, December 19th, 2009, 12:37 PM
|
||||
|
||||
|
Awesome info. Everytime I read about them i want one more and more.
__________________
2003 F-250 7.3L Superduty Ranchhand Bumpers front and back ~ 6637 Intake ~ Zoodad ~ CCV ~ 5" Exhaust w/ 6" SS tip ~ Train Horns ~ Viair 450C ~ 5 Gallon Air Tank ~ Sound System ~ PHP Phoenix 6 position ~ 4 Dipricol Gauges on the Pillar ~ 05 Conversion ~ 08 Taillights **Soon To Come** 08 Tailgate ~ Adrenaline HPOP ~ More Gauges ~ Built Engine
|
|
#4
Sat, December 26th, 2009, 06:57 AM
|
||||
|
||||
|
Part 2: The Results
Here's the part I'm sure everyone has been waiting for. Well, I finally got a few hours to plow through the datalogs and start graphing everything out. First, I want to cover the graph data and offer some comments on the results before I get into more detailed observations about my experiences with the Adrenaline and Overdrive (A&O) combination. I do want to note that at this time I wasn't able to directly overlay runs for a number of reasons. First, all the runs we did were on the street and we had to make considerations for traffic, road conditions, weather, and such. Because of this, we did our best to recreate similar before and after runs and ended up doing several runs in each logging session. With over 150 runs and a couple hours worth of data, I had to use runs that were similar in nature in order to provide the best visual representation. A controlled environment (in other words a dyno) would have been ideal, but that simply would have exceeded our budget at this time. Second, because of limitations with Microsoft Excel's graphing capabilities along with minor timing variances with the datalogging software, it was extremely difficult to get the timestamps on the different datalogs to line up and provide a usable, direct overlay comparison. We are looking at some graphing software that is capable of working more efficiently with this type of data and provide more direct visual comparisons. Given the amount of data we have collected, I feel the graphs below provide an accurate overall representation of the results. Also, because some runs used may have been the second, third, or higher consecutive run in a session, there will be some discrepancies in Engine Oil Temp (EOT) values. I fully recognize that the Adrenaline and Overdrive ran consistently higher EOT values, but when analyzing all the data on hand, we saw an average of only 8 to 10 degrees increase versus the stock HPOP setup, with more significant increases being observed in runs where pressure difference were extremely large (such as Level 2 and 3). Keep in mind that as the oil pressure increases, you can also expect to see a rise in EOT. So with that out of the way, let's get started...  I guess the best place to start would be with the stock calibration. As mentioned before, since this was a 2000 truck I decided to use the de-facto standard of VRAA6S3 (PMT1) for testing. As far as chips go, this is what many 1999½ to 2001 PSD owners are running, while many 2002 to 2003 owners are very likely running the VHDx/PMT1 hybrid that we developed over 6 years ago. Obviously, OBS trucks and most early 1999 PSD owners along with the Manual Tranny folks are going to be running different strategies, but I don't think that it will really have any bearing on the test results and I would expect those vehicles to see similar improvements. With the stock calibration, we would naturally expect to see the least difference between the charts in the comparison and this is pretty much what we've observed. The most noticeable change wasn't any significant change in ICP, but was actually a sizable reduction in IPR duty cycle. Also readily noticeable was as much smoother ICP curve, which was presumably due to the faster pump speed providing a more stable rail pressure. One thing I did notice was that the truck seems to start a little quicker and throttle response is just a little snappier, although those are merely subjective observations. STOCK Stock HPOP (click to enlarge...) 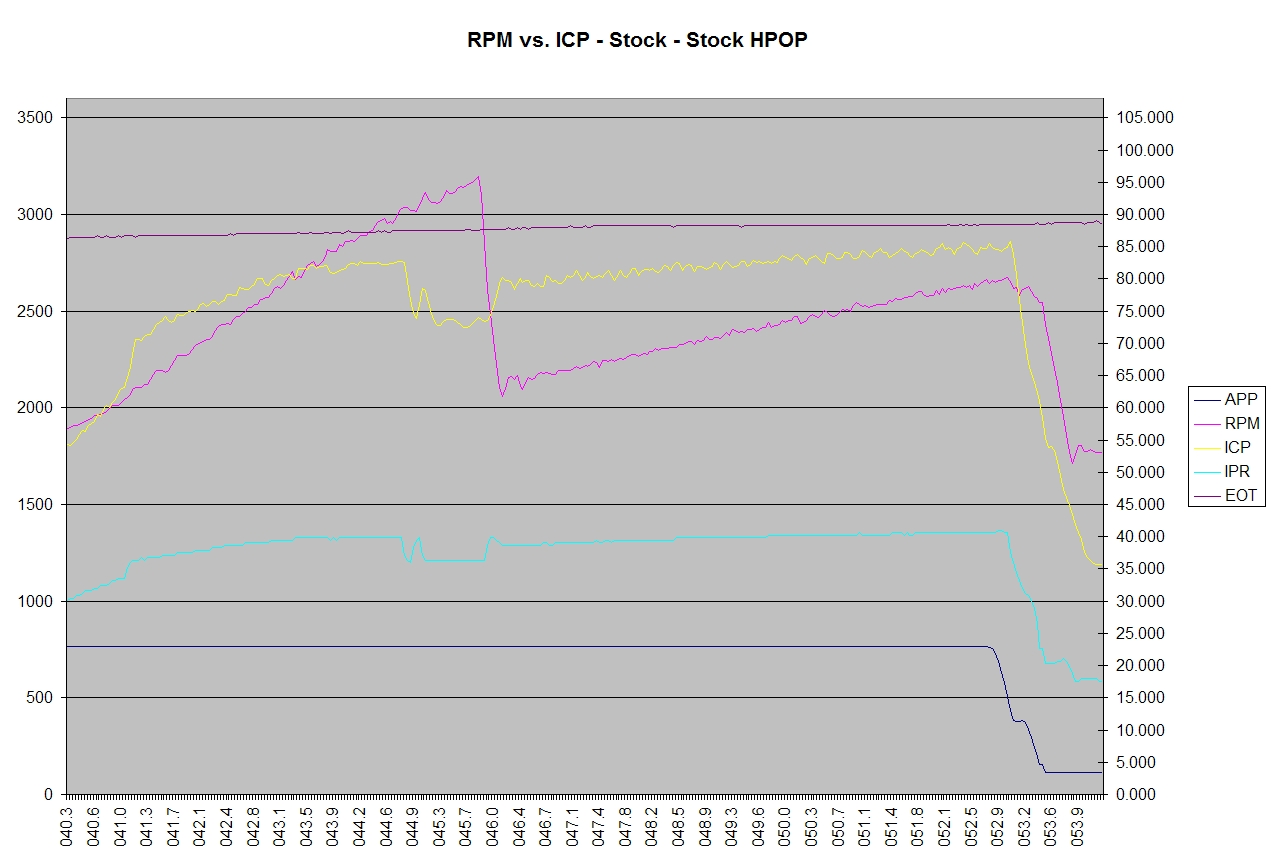 Adrenaline and Overdrive (click to enlarge...) 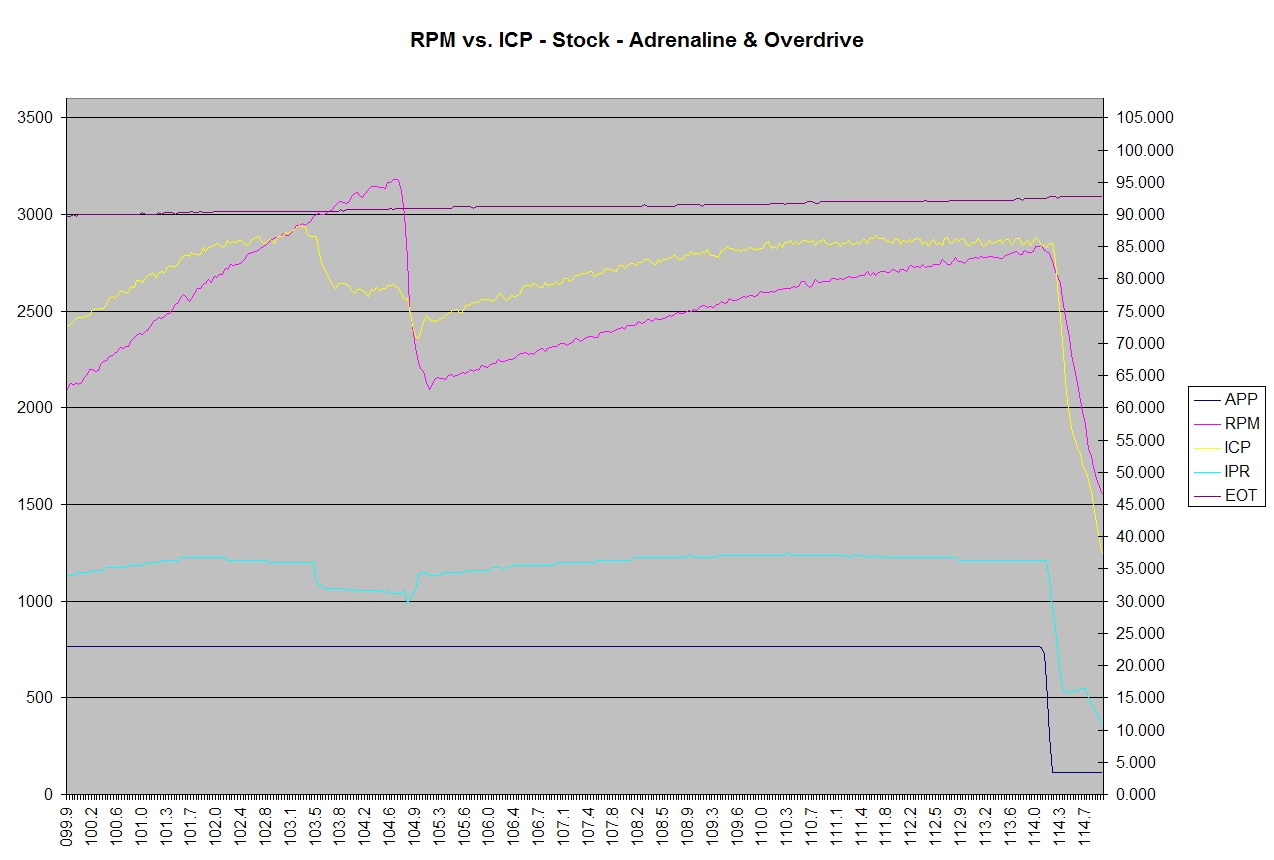 As we move on to the Level 1 program, we again see results that are very similar to the Stock program. The drop in IPR is readily noticeable with only minor differences elsewhere. EOT is again higher, but only by a few degrees which is consistent with our observations. Evolution Level 1 (60 HP) Stock HPOP (click to enlarge...) 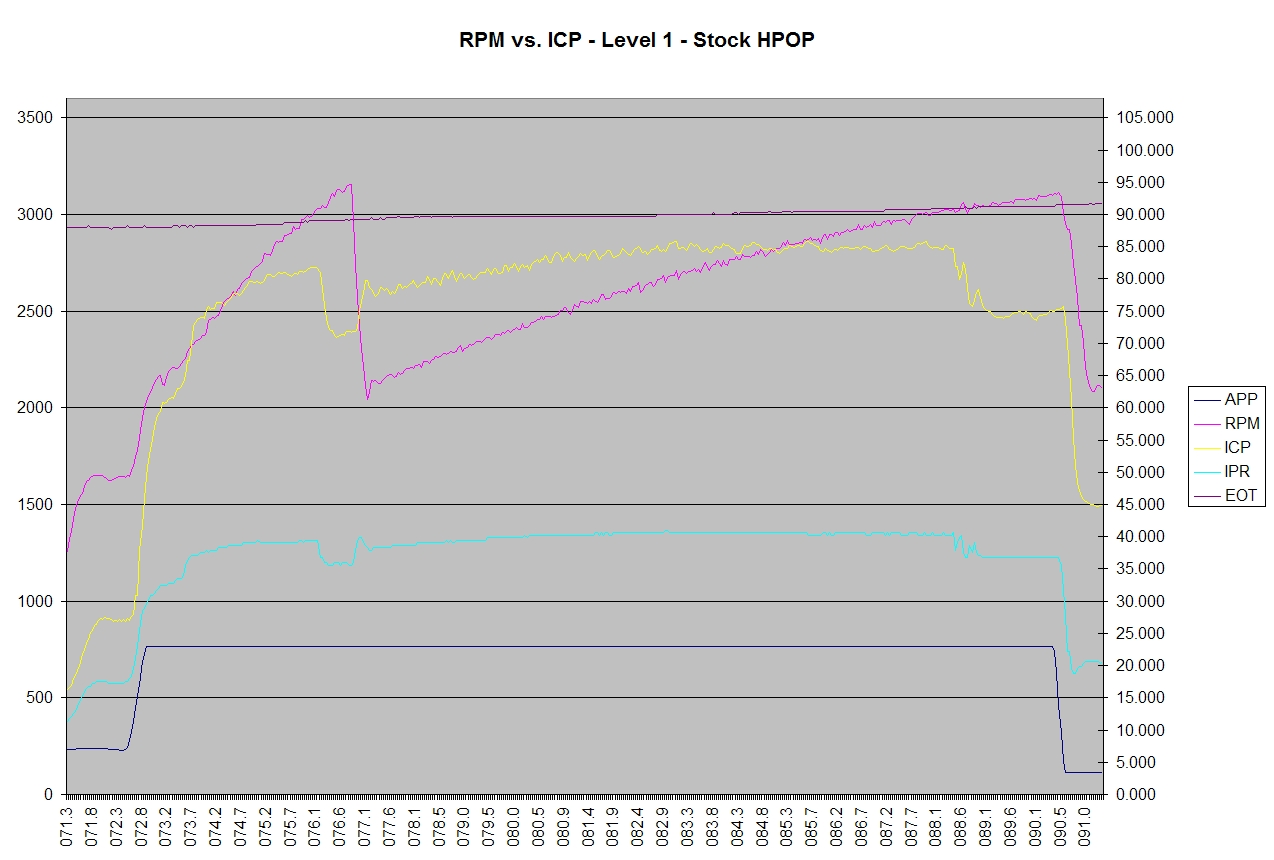 Adrenaline and Overdrive (click to enlarge...) 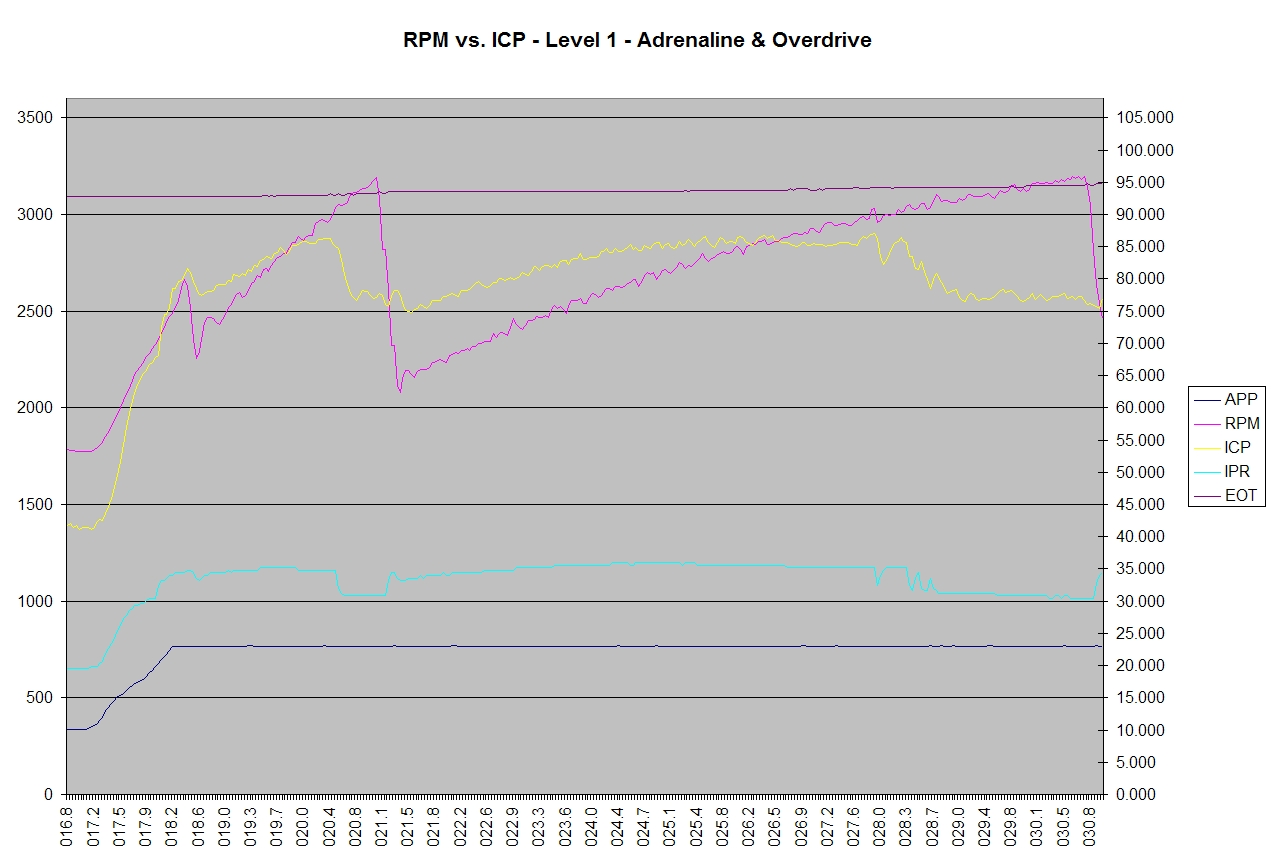 Level 2 is where we really start to see things happening. You can clearly see that the stock pump is now no longer capable of providing the oil volume that is being demanded by the injection system. In struggling to maintain even 2200 PSI, the IPR is steadily climbing at a rate of 3% per second. This is where most people feel the lack of power at full throttle and is actually what I felt under these conditions. A P1211 code was observed during this run, consistent with the lack of ICP. In looking at the A&O graph, it is readily apparent that not only is there no problem maintaining 3100 PSI (actually overshooting a little at the start of the curve) but the IPR curve is less than 40%. There is no question here that the A&O setup is working effectively. Mid to upper RPM acceleration was consistent and strong with no noticable flat spots at all during the run. Evolution Level 2 (80 HP) Stock HPOP (click to enlarge...) 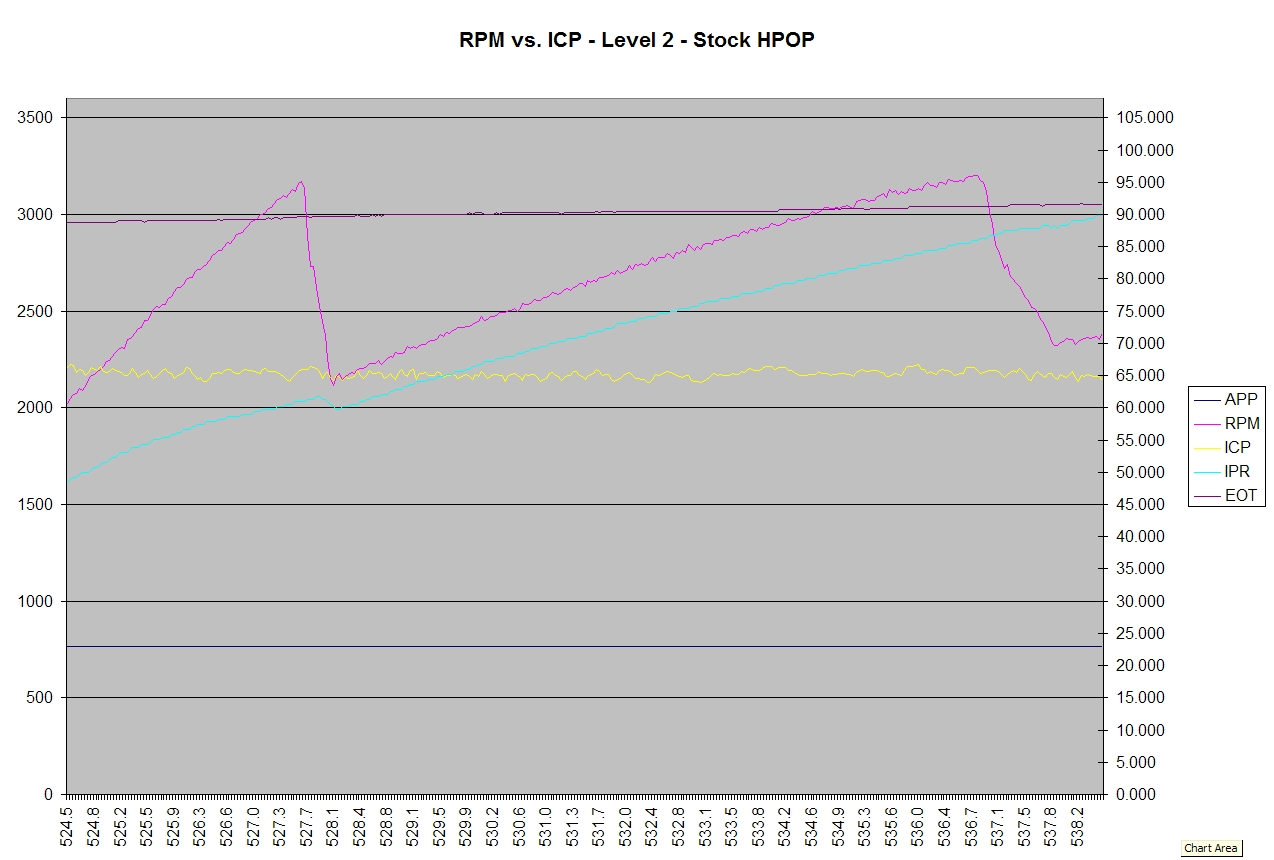 Adrenaline and Overdrive (click to enlarge...) 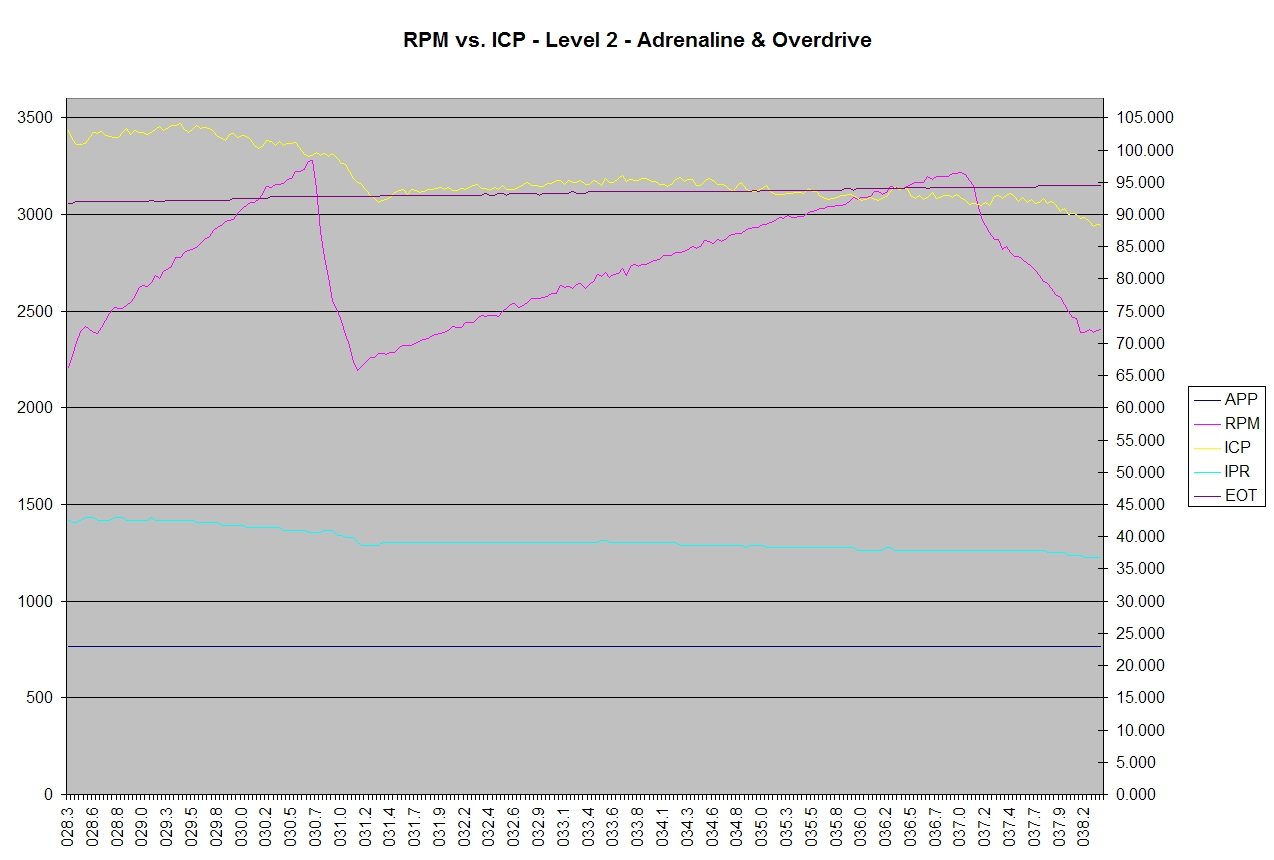 So now we arrive at level 3. Just like with Level 2, the stock pump is not able to meet the volume demands, dropping to 2000 PSI for much of the run and the IPR curve rising 3% per second trying to keep up. The somewhat "flat" feeling at full throttle was consistent with the corresponding drop in ICP and a P1211 was also observed during this run. With the A&O setup, the curve was again much like the Level 2 program. Acceleration was consistent throughout the run with the curve showing the ICP fully stable and the IPR curve settling in at about 40%. This felt about as strong as any otherwise stock injector truck could feel, although again, these are merely objective observations. Evolution Level 3 (100 HP) Stock HPOP (click to enlarge...) 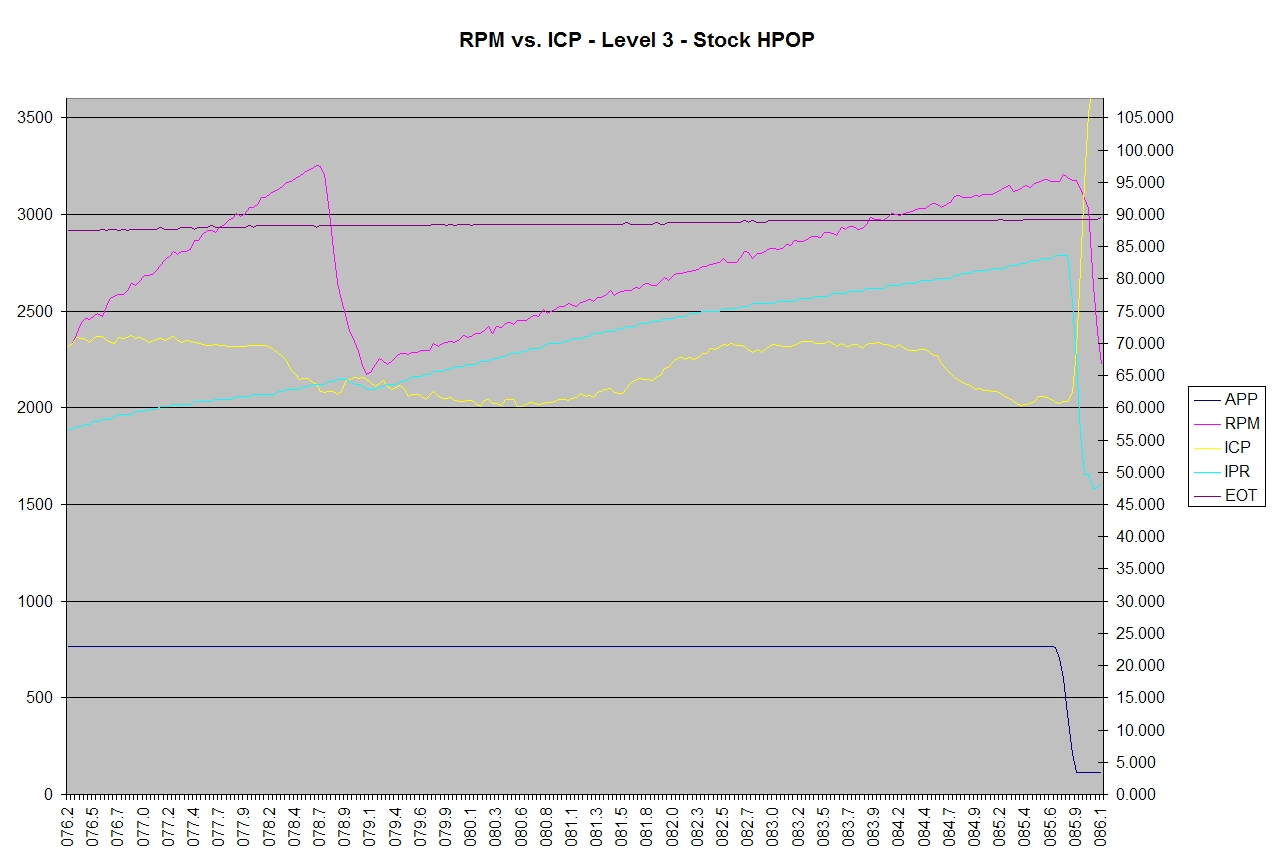 Adrenaline and Overdrive (click to enlarge...) 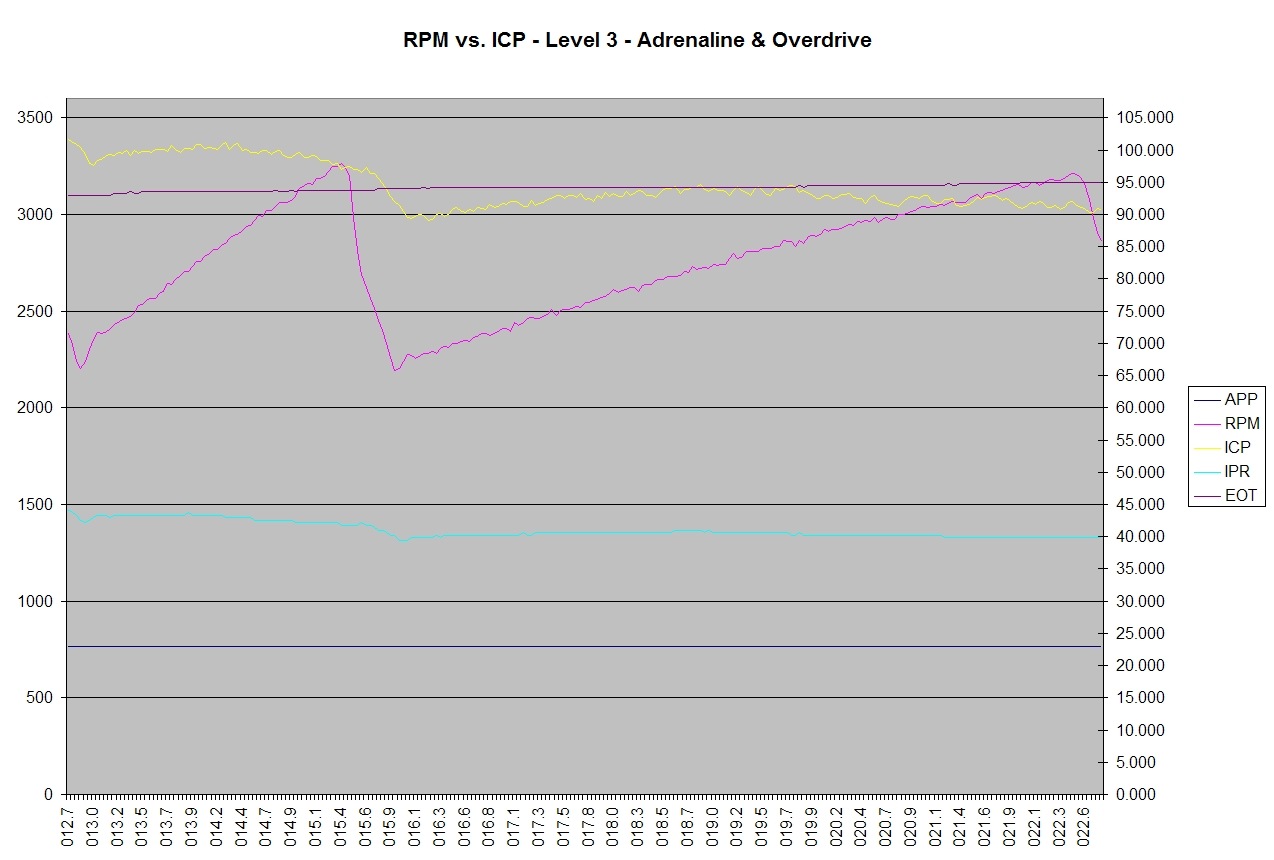 The next graph is a 4th gear, full throttle run in Level 3 from 75 MPH to 95 MPH which lasted about 14 seconds. The ICP curve is about as flat as you could possibly ask for with the IPR at about 41% for the entire run. I don't have a stock run of this, for which I apologize. Evolution Level 3 (100 HP), 4th Gear, 75 MPH to 95 MPH Adrenaline and Overdrive (click to enlarge...)  I know these graphs are just a small snapshot of the data we recorded, but I feel that it is a fair representation of the all the data we collected. My personal observations have all been positive and I am extremely impressed with results. While there are a number of performance related products available for the 7.3L, very few offer the immediate and unquestionable results that I experienced with the A&O setup. Given the cost of the setup (Overdrive AND Adrenaline), it's less expensive then most twin pump setups and will provide more than enough oil to feed even the thirstiest of injectors. If you take the Adrenaline out of the equation and just run the stock HPOP, then it becomes an even better proposition as it cuts the costs dramatically and still performs well. There is no question in my mind that the A&O setup worked as expected (or even better) and even though it far exceeds the oil demands of the average truck, it worked very well with no modifications at all to the tuning. Here are some of the improvements I have noticed resulting from simply installing the pump setup:
Up to this point, there were only a couple minor issues that I experienced when running the setup. The first issue was a minor fluctuation at idle. The idle would slowly roll about 50 RPMs and could be felt in both neutral and in drive. This phenomenon is easily resolved with minor tuning changes and we have already isolated and resolved this issue for future calibrations. The second issue was regarding management of the ICP curve, particularly under hard acceleration in lower gears. On standard calibrations, the IPR is set up to respond in a certain amount of time to changes in oil demand. As seen in some of the above runs, this adjustment occurs at the rate of about 3% per second. In first or second gear, the acceleration of the engine cause the pump to produce oil faster than the IPR can adjust to release it. What we end up with is an initial overshoot of the desired oil pressure (some runs showing over 3600 PSI) and then a slow drop in pressure as it stabilizes. This is directly related to the fact that the pump was spinning 66% faster than stock or 42% faster than the engine. Again, small changes in the tuning easily rectify this situation and prevent the problem of overshooting the desired ICP. The third issue was a minor increase in EOT during hard acceleration, particularly on runs done in quick succession. Part of the increase, I'm sure, is in direct relation to the fact that we are generating 25% to 30% higher ICP versus the stock HPOP under high load conditions and this increased pressure is also raising the temperature of the oil. The change was usually 4º to 5º C (8º to 10º F) with a couple runs just tipping over 100º C (212º F). Since the main fuel and SOI offsets consider anything up to 112º C (236º F) to be normal operating range, I am not at all concerned with these values, especially since at cruise the EOT was relatively identical to temperatures observed with the stock HPOP. The next tests will be to run the 25% Overdrive with and without the Adrenaline, as well as the Adrenaline by itself. This should prove to be quite interesting and I think the results will be on par with what we've already seen. I'd also like to get my hands on a 100% Overdrive, but that's probably pushing the limits of what a stock truck can handle. I think for the price, you simply won't find any better way to improve the volume of the High Pressure Oil System. Even if it were in the same price range as comparable systems that are already available, the flexibility and features would still make it well worth the money. Until next time, enjoy!
__________________
Bill Cohron - The Mad Doctor Power Hungry Performance - The ORIGINAL in Ford performance tuning... Since 1996! (678) 890-1110 www.gopowerhungry.com - Home of the Hydra Chip, Minotaur Tuning Software, and the new Orion Reflash System for Navistar! Bring back Windows XP and 7. Windows Vista and Windows 8 is a pain in my a$$! Windows 10 is only slightly less annoying!
Last edited by Power Hungry; Sun, December 27th, 2009 at 03:06 PM.
|
|
#5
Sat, December 26th, 2009, 11:09 AM
|
||||
|
||||
|
That right there is some good information. Thank you very much for taking the time out of your busy schedule (what? you busy?
 ) to do this research! ) to do this research!
__________________
Tuning, flashing, burning chips, and repairing all aspects of 7.3L Powerstrokes. SEVEN 7.3L-powered vehicles in the driveway. Two didn't come that way from the factory!
|
|
#9
Tue, February 23rd, 2010, 08:05 AM
|
||||
|
||||
|
Yeah, Bob Riley makes them.
__________________
Tuning, flashing, burning chips, and repairing all aspects of 7.3L Powerstrokes. SEVEN 7.3L-powered vehicles in the driveway. Two didn't come that way from the factory!
|
|
#10
Tue, February 23rd, 2010, 03:32 PM
|
|||
|
|||
|
I already have an adrenaline, so now I spose I'll have to get an overdrive too. Then injectors, then of course yet another larger turbo...then the tuning will have to be redone. When does it ever stop??
 
|
|
|
|


 Linear Mode

